My sister lives far away and I am unable to visit her before baby arrives so I decided to throw her a virtual baby shower. I search many different online options but they all wanted you to pay a fee to create a website. Which is a good choice but I choose to spend my baby shower money for other things.
First thing I did was create a event on Facebook called Baby (name) virtual Baby shower.
I created a invitation:

Then invited my sister, family and her friends to the event. Those invited can add others as well.
I put the description to the event as follows:
“I am throwing an online baby shower for my sister since we live far apart. There will be games, polls and more all on Facebook, there will be prizes to the most correct answers! Answers will be posted on 10/16. This is her first little one. She is registered at Amazon under Mommy’s Name”.
Then I created polls with Facebook and asked a variety of questions that I found on Pinterest and added 3-4 choices for each:
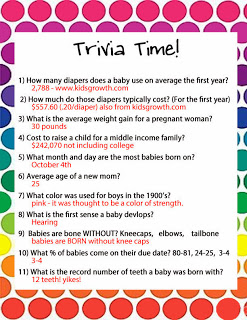
I added a couple of questions every day or so to keep interest and remind people of the registry. I also did a few questions with images such as what is mom’s belly size? (added as a poll option), how many baby wash cloths fit into bunny jar? (Special prize $10 Starbucks card for correct answer). I also added a few give mommy to be advice such as: Best way to put baby to sleep? Favorite moment raising kids? Things I wish I knew before having a baby…

I mailed my sister a goody box with a note explaining this was a baby shower box with the following a sash, bunny jar with baby wash cloths (online contest), baby stickers for baby book, baby book, treat for mom and put colored grass at bottom to make it look cute when opened. My sister wore the sash when opening presents and added the pictures to the Facebook event when she opened the gifts.
All questions had to be answered by specified date and time of virtual baby shower event. I posted answers on the baby shower date. There was a three way tie for correct trivia question anwsers so I asked an open ended number related tie breaker question. The closest correct anwser won. I printed a copy of the event postings and mailed it to my sister for her baby book. I also mailed prizes to winners. I decided on gift cards to be the prizes since they are easy and cheap to mail. Overall it was really fun, inexpensive and easy to put on.


 Then lay on parchment paper.

 If you have a collection of cards like I do and want to keep them. I have a solution for you instead of them just taking up space in the bottom shelf in that old shoe box. I got a lot of baby shower cards for my son and wanted to have a nice way to display them and pass onto him when he has a family. So I decided to make a card book. You can do this with any collection of cards for example make an anniversary card book, birthday card book, Christmas card book, etc.